Creating a documentation project
Each documentation project is maintained in its own Git repository and needs to conform to a certain structure[1] in order for the documentation website to be able to integrate it.
Creating a Git repository from template
-
Visit the documentation project template repository in your browser.
-
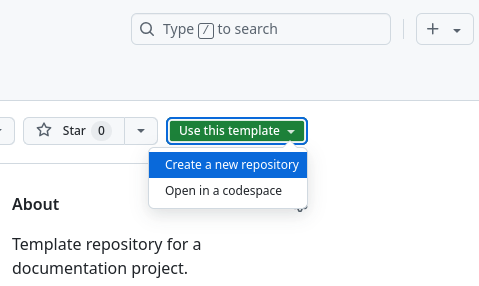
Click the Use this template button located at the top-right and choose Create a new repository from the emerging dropdown:

-
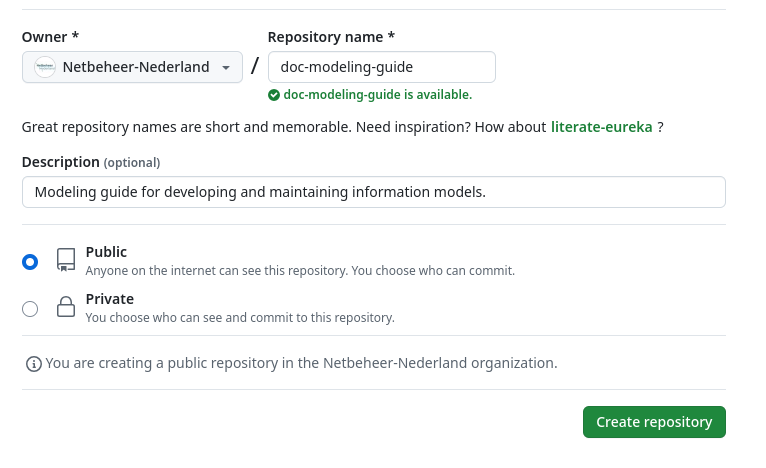
Fill in the form to create the repository:
Example 1. Fill in details to create the repository
-
Set the repository owner to Netbeheer-Nederland.
-
Provide a name for the repository. Make sure to follow the naming conventions[2].
-
Provide a description for the repository.
-
Set the repository visibility to Public.
-
-
After clicking Create repository you should be redirected to your new Git repository.
Configuring the project
You’ve now successfully bootstrapped a documentation project. Now let’s configure it.
-
Open the
antora.ymlfile[3] at the root of the project and edit according to the following instructions:name: modeling-guide (1) title: Modeling Guide (2) version: true (3) start_page: index.adoc (4) nav: - modules/ROOT/nav.adoc (5)1 The namevalue uniquely identifies the project within the entire documentation site. It is used, for example, to do cross-referencing from one project to another. Please follow naming conventions[4].2 A titlefor your project, suited for presentation on the documentation website.3 Use versionto describe the version of the project. It is strongly advised to set this totrue, causing the version identifier to follow Git[5].4 The start or root page of the project. It defaults to index.adoc[6], but you can set it to a different name here.5 Under the navkey you can specify navigation files to structure the pages in the project. -
Save, commit and push the changes.
Please refer to the Antora documentation for more details on configuring the Antora playbook and antora.yml.
Registering the new project with the root documentation project
The documentation website can only show projects it is aware of. Whenever a documentation project is created or renamed, the root documentation project which generates the website must be made aware of this. Since site generation is configured through an Antora playbook (antora-playbook.yml), we will proceed to make the necessary changes there.
-
Have the root documentation project Git repository checkout out.
-
Open
antora-playbook.yml, look for thecontentkey and follow instructions:content: sources: (1) - url: . (2) branches: HEAD start_path: ./root_component - url: https://github.com/Netbeheer-Nederland/doc-documentation-manual (3) tags: v* - url: https://github.com/Netbeheer-Nederland/doc-modeling-guide (4) tags: v*1 The sourceskey undercontentis where content sources are specified. Documentation projects must be added here in order to be integrated.2 You can ignore the content source which has a relative URL[7]. 3 Items with an absolute URL point to documentation projects. 4 To register a new documentation project, add a new item to the list. Provide a urlentry which points to the project’s Git repository, and add the entrytags: v*to exclusively aggregate content from tags starting with av[8]. -
Make the new project findable by adding it to the site navigation. This is done by editing the root component’s
nav.adoc:* xref:documentation-manual::index.adoc[Home] (1) * Modeling Guide (2) ** xref:modeling-guide::index.adoc[] (3)1 Navigation files are lists. Also, by providing text between the brackets ( []) you can set the link text.2 You don’t have to exclusively write references. Using plain text headers can sometimes be beneficial for structuring the content. 3 Add references for all pages in any structure you see fit. Note you can leave the text between the brackets empty, automatically causing the link text to be the referenced page’s title. -
Commit and push these changes to the
mainbranch. -
Make sure to rebuild the documentation website once you wish to actually see the new documentation project appear on the website.
antora.yml file) and modules (a modules directory).
doc-, and write the rest of the name in lower-kebab-case.
lower-kebab-case.