Working on a draft
Writing content
Here, only a short summary is given to get you started. At some point a more extensive guide on how to write content and leverage helpful tooling will have to be written.
Write content in AsciiDoc
Content is written in the AsciiDoc markup language. Its well-standardized and expressive plaintext nature is what we require for our durable, documentation as code workflow. You can read more about our motivation for documentation as code and AsciiDoc here.
You can write AsciiDoc in any IDE or text editor. For learning the language refer to the large variety of resources on the web.
- xref:linkml-guide
-
=== Making cross-references
Using Antora’s resource IDs you can easily cross-reference any resource — or element that’s part of it — from
To make cross-references from one resource to another,
or to another resource that’s known to Antora, you can make use of the xref macro. You can only reference resources known to Antora, i.e. coming from specified content sources.
| If you want to refer to other resources that are not |
Prefer referring to explicit versions
For a very detailed explanation, refer to: Create Page Links.
| When cross-referencing resources, do not use relative paths, but use Antora resource IDs. Read more on why this is encouraged in this issue. |
Embedding Diagrams.net (draw.io) images
Diagrams.net drawings are used extensively in our documentation. For greatly enhanced maintainability the following way of working is advised:
-
Create and edit your diagrams in the Diagrams.net application, web or desktop.
-
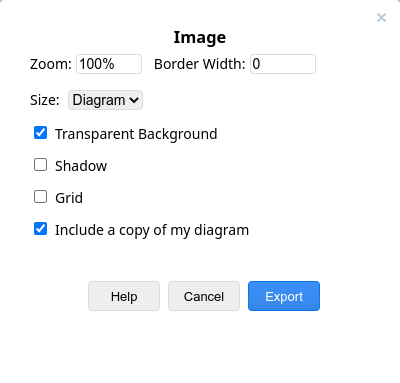
Export the diagram to the SVG or PNG format
-
This can be found under File > Export as > …
-
Important: save a copy of the diagram inside the image so you can edit it later:

-
-
Save the image to the
modules/ROOT/imagesdirectory of your project. -
Use the
imagemacro to show the image at the desired place in your document(s). For example:image::my_diagram.png[] -
You can edit the diagram by opening the image in the Diagrams.net application.
|
You can use hyperlinks in the diagram to jump to associated sections in your document by adding those relative anchors as links in Diagrams.net. For this to work you need to pass the Note that this seems to work only with the desktop application, since the web app exports absolute URLs that are relative to the Diagrams.net web app. |
Editor and IDE support
As discussed, AsciiDoc is plaintext and can be edited in any editor. However, editing this way can become quite tedious unless you use an editor with more advanced features.
Features to be looking for:
-
Syntax highlighting
-
Autocompletion of AsciiDoc macros and constructs
-
Automatic checking for dead references
-
Syntax validation and linting to help with writing correct code
-
Live previewing of rendered documentation
-
Navigating between files with jumps and using a file explorer
-
Git support
This is not an exhaustive list of course, but if an editor supports the majority of these features it will really make your life easier.
Following are some suggestions for IDEs which are popular, easy to use and support good plugins for working with AsciiDoc.
IntelliJ IDE
The IntelliJ IDEs are famous for their full-featured integrated development environment where basically everything is taken care of.
Where it stands out:
-
Powerful, accessible yet highly customizable UI
-
Best AsciiDoc plugin currently available
-
Autocompletion works really well
-
Live preview pane, including diagrams as code
-
Antora aware, so it provides a lot of help with cross-references as well
-
-
Great support for Git built-in
| Get a free version of the application by looking for the Community Edition. |
Visual Studio Code
Another greater editor for writing AsciiDoc is Visual Studio Code.
It comes with a lot less batteries included than IntelliJ’s IDEs, but that could be a feature depending on your preferences.
Where it stands out:
-
Lean, simple editor but with a great host of extensions available that are easy to install
-
Very decent AsciiDoc plugin available, although not quite as powerful as the IntelliJ one
-
It’s Antora awareness is limited at best, not working at worst. This means live previewing is very limited as well at least for our projects.
-
-
Great support for Git built-in
Other editors
There are plugins for Emacs and Vim as well, and likely for many more editors. However, nothing seems to give as much of a fully featured and integrated experience as the IntelliJ IDE does with its AsciiDoc plugin, so that one is highly recommended.
If you do decide to use some other editor, just be aware that previewing will very likely not work with anything that’s referenced through Antora resource IDs such as partials and images. Since we do use Antora resource IDs for every reference, this means all partial including and image rendering won’t work in the preview. Luckily we can preview in other ways as well.
Previewing changes
Luckily it’s not an absolute requirement that our IDE provides a live preview as we type. In fact, this preview is inherently limited in the first place, since it renders in a different way and context than the eventual Antora setup would.
Running Antora locally
To preview the entire documentation website as it would be rendered in production, but locally including your changes, you can run Antora locally.
See: Using Antora Locally.
Committing new changes
Since we rely on Git for versioning, much of the best practices that apply generally when working with Git also apply here.
A few words of advice that cannot be repeated enough:
-
Keep commits small.
-
Provide descriptive commit messages that are as short and to the point as possible.
Syncing changes to the remote Git repository
After having committed a bunch of changes locally, you can sync changes to the remote Git repository simply by using a Git push.
How often to push is a matter of debate but also taste. Reasons to push often include:
-
Receiving feedback through a GitHub (draft) pull request requires the commits to be pushed to the remote.
-
Local work could get lost due to hardware failure or viruses, although this is usually not a realistic concern since unless you push really rarely which is discouraged anyway.
Receiving feedback
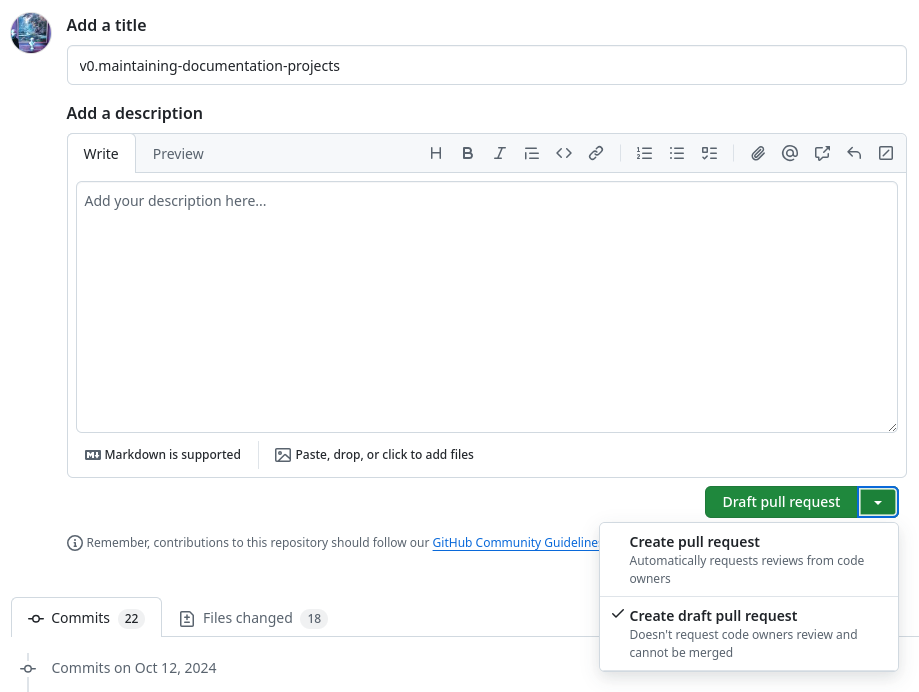
To receive feedback we advise using GitHub draft pull requests, i.e. pull requests with the draft status.
Creating a draft pull request
From the GitHub documentation:
To create a pull request that is ready for review, click Create Pull Request. To create a draft pull request, use the drop-down and select Create Draft Pull Request, then click Draft Pull Request.

Reviewing and discussion on GitHub
Once the PR is created, you can start a review. In a review you can provide comments through inline threads where collaborators can discuss.
-
Click the Files changed tab:

-
Scroll down to read what has been changed.
-
You might want to show only
.adocfiles using the file filter:
-
-
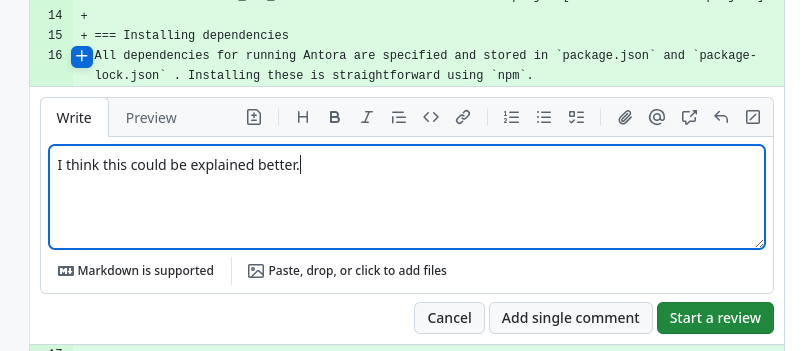
When you like to comment, click the
+icon that appears when hovering over a line:
-
Click Add single comment to start a thread for this line:
-
-
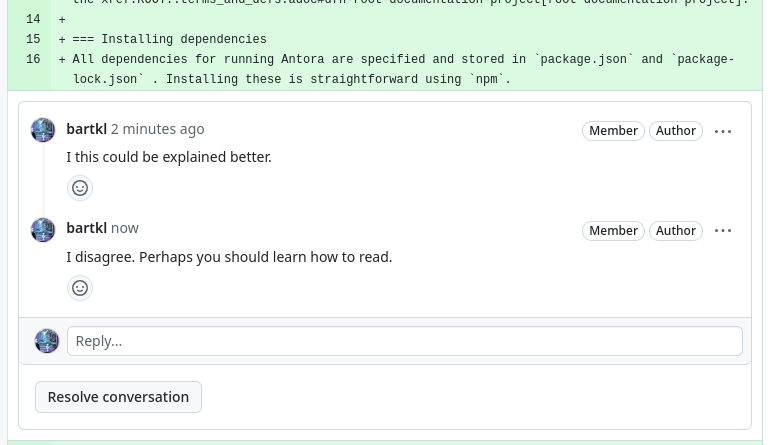
Other collaborators can now discuss the feedback with you in that thread:

-
Once a discussion is settled, you can resolve the thread by clicking Resolve conversation.
-
| Once you’ve obtained feedback, you can make changes, push those to the GitHub repository and the pull request will pick up on those changes. This means you can keep a draft pull request open for as long as you keep working on it, and have a single place where you can periodically ask for feedback. |